Our five small galley base cabinet drawers never met our cooking storage needs, and we rarely utilized our pull-out butcher block counter. We were also annoyed having drawers behind a door. So, after 6 years I built up enough courage to do something about it. We now have plenty of cabinet storage for all cooking needs and more. My wife is "very" happy to have everything in one easy access location where she needs it. This also opened space in other cabinets for other things.
Comparing "Before & After" space, here are the "square inch" totals of drawer bottom surface areas.
Original Five = 837 sq. in.
New Three = 1557 sq. in.
To make a fair comparison, I need to mention the original arraingement suspends the sliding flatware tray providing extra space underneath it. But for us, it was inconvenient limited-use space if you know what I mean.
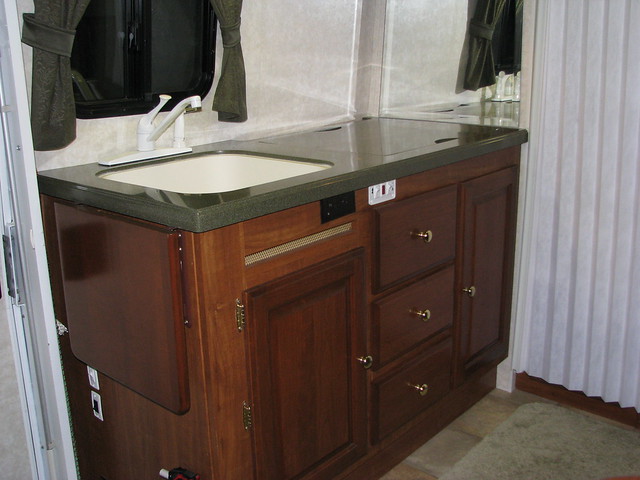
Here is the original cabinet with 5 tiny drawers and the pull-out butcher block counter. PCs made after 2005 or 2006 are made this way. The earlier design is close to it and can be reconfigured in the same manner. Admittedly the original design looks nice.
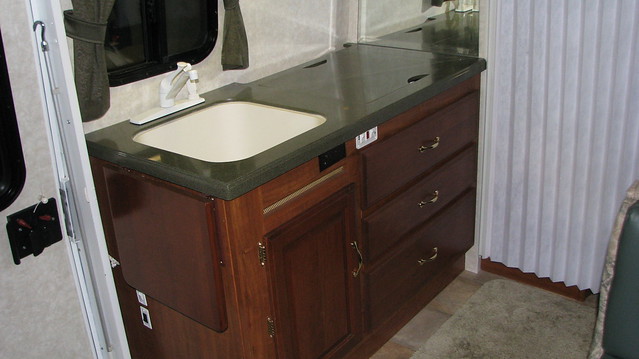
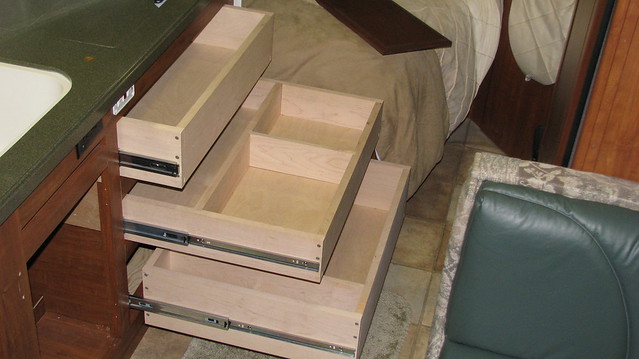
Here is the cabinet afterward with three full width, maximum depth drawers.
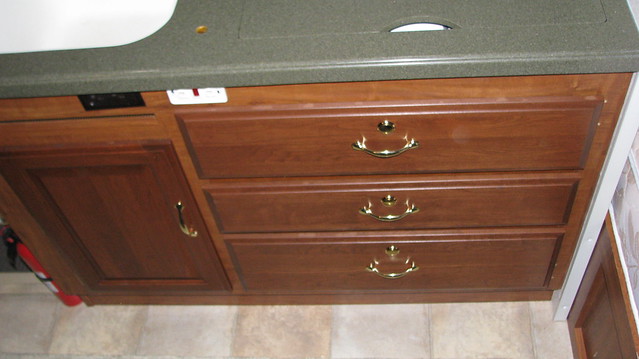
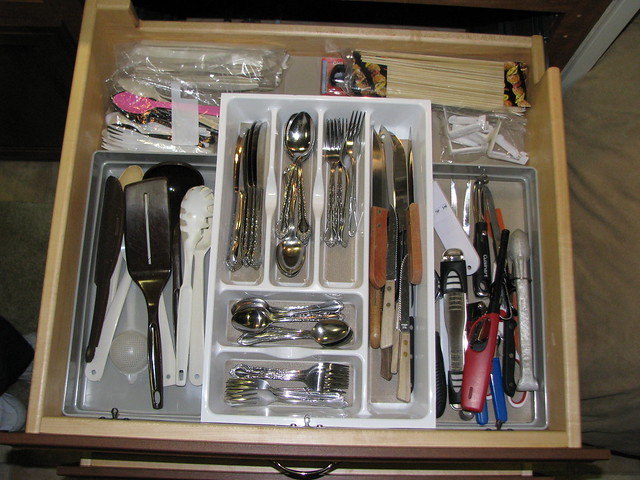
Here are the drawers today. I later learned I needed to add locking latches to keep the drawers closed while in motion. I originally had 5 magnetic catches per drawer, but very bumpy hairpin right turns overcame their strong hold. Also My wife didn't appreciate the jerk it took to open the drawers. Now with 2 magnetic catches, she says it's just right.
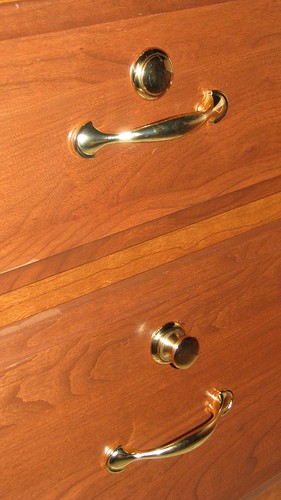
The latches are commonly used on other brand motor homes and easily found for sale on the internet, common in the brushed stainless finish, very rare in the polished brass finish.
When the button is in, the drawer is locked.
When the button is out, the drawer can be opened.
Each drawer also has two magnetic catches to hold it closed even when unlocked, useful when the rig is slanted down and away from the cabinet.
------------------------------------------------------------------------------
Here is a quick run-down on the project. There is so much more than implied. I don't consider this project easy at all. I wouldn't want to do it a second time. If you are seriously considering doing this with your PC, contact me directly.
I first removed the drawers and butcher block to evaluate the situation.
Note the copper gas line in the upper back left side.
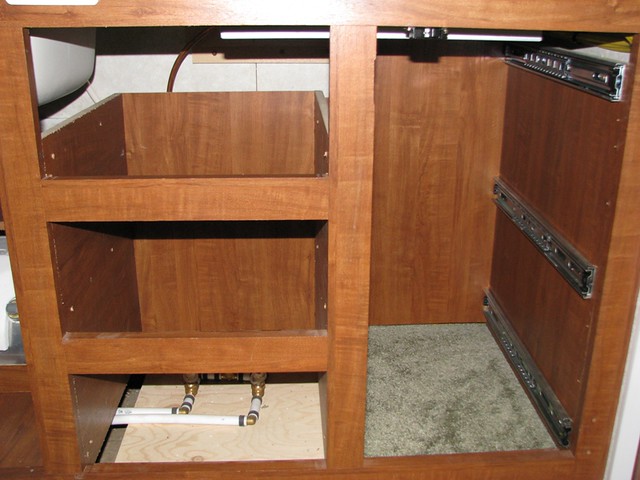
I identified how much space behind the drawers was not utilized.
Convinced to continue, I gutted the cabinet interior and removed the front rails & styles.
Here were the obstacles I needed to consider in making the three new drawers as deep as possible.
1) black drain pipe with service cap (relocate it)
2) gas line for stove (relocate it against the back wall)
3) the stove hangs down (work around it)
4) storage pocket for Corian stove & sink covers (work around it)
5) wiring in the way (re-clamp out of the way)
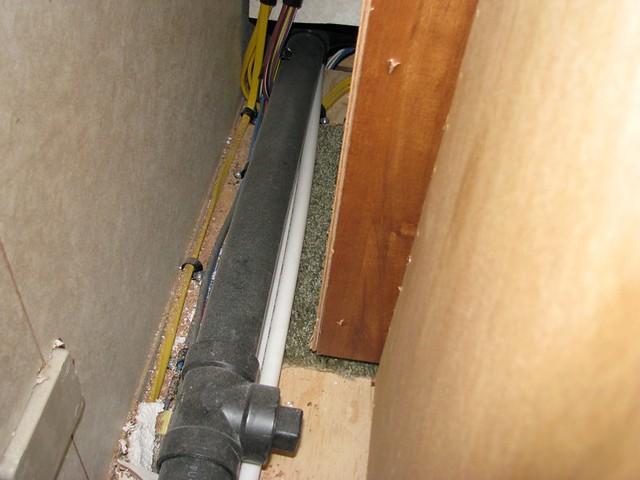
In this picture I had already bent the gas line partially out of the way
Determining The Height Of The Three New Drawers (Critical & Detailed)
If the top drawer was made low (shallow) as is commonly practiced in houses, the hanging stove would significantly limit usefulness. So I made the opening taller than normal, 6 tall.
The middle opening is 5 tall to clear a new sink drain flex hose to achieve maximum depth.
The bottom opening is 8 tall which is great for pots and pans. It stops just short of the flex sink drain hose making it a few inches less deep than the middle drawer.
With this all planned out in great detail, I then ordered three new appropriately sized drawer fronts and two new rails from Phoenix USA.

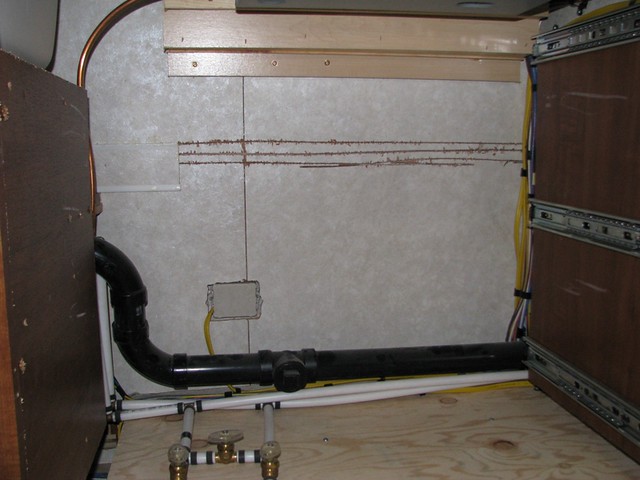
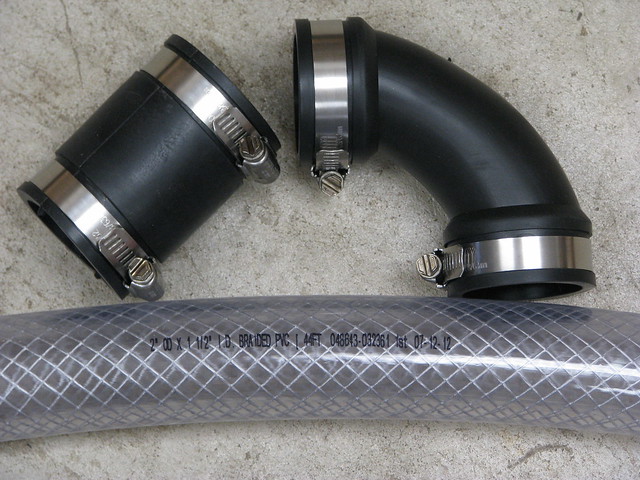
I rerouted the hard black drain pipe using flexible components clamped tight against the back wall to achieve maximum bottom drawer depth. The gas line got nicely bent out of the way. As seen here, the left interior wall was extended upward to mount the top drawer glide higher. Not seen, the rails have 1x2 across their back side to strengthen them.
I bought these parts to reroute the drain. Home Depot was the only place that sold such large diameter 1/4" thick flex hose that works perfectly with this clamp-connecting approach.
Details About Depth
The top drawer clears both the hanging stove and Corian cover pocket by notching the right side and back.
The middle drawer is Full-Depth as there are no obstructions.
The bottom drawer is a few inches short of the back wall to clear the flex drain pipe.
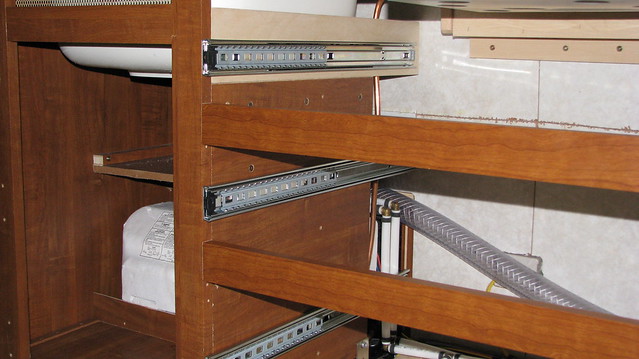
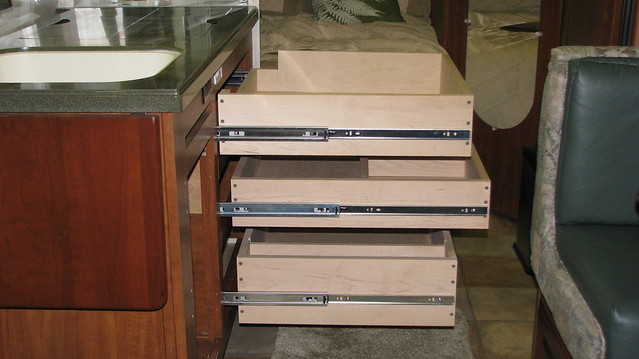
Here are the three different drawer depths. Clearly visible is the top drawer notch work.
To reduce the sliding of contents while braking hard, we planned some compartments.
The top drawer is mainly assigned for the original PC utensil tray and related cooking utensils. Trays are held in place using carpet tape.
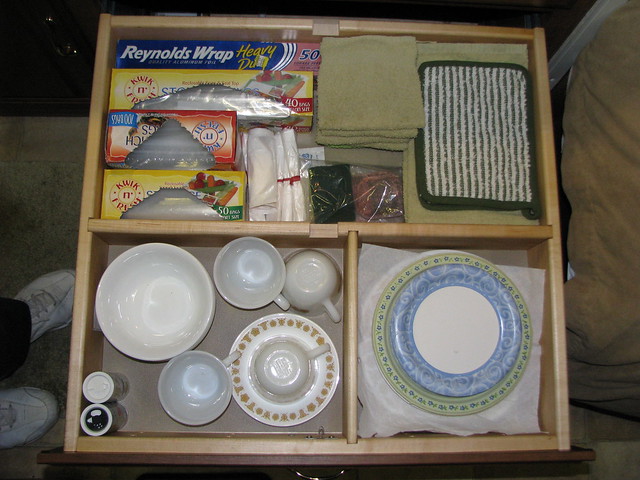
The middle drawer has a compartment for Corelle plates & saucers, another compartment for cups, and a third for miscellaneous.
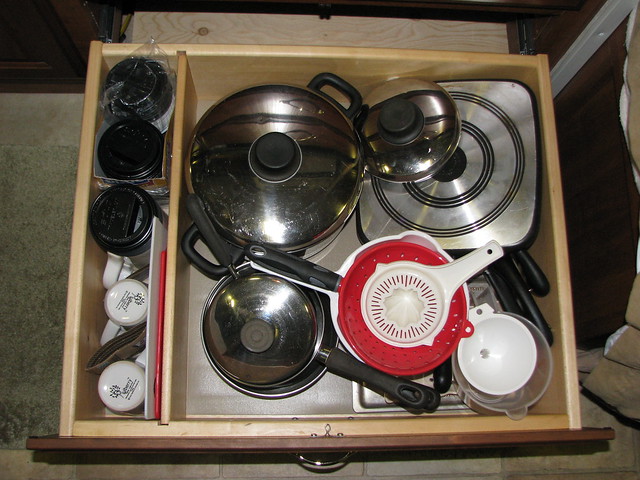
The deep bottom drawer has a compartment (is hardly noticed in the picture) on the left side for tall mugs and cutting boards.
To finish the project, the drawers got their fronts with felt bumper pads. I went with snag-free handles throughout the base cabinet instead of the knobs which occasionally caught our clothing and knee caps.
The final touch were rubber drawer liners to reduce rattling of contents.
Here is what we store in our new drawers. I am sure we will optimize it on our first long trip.
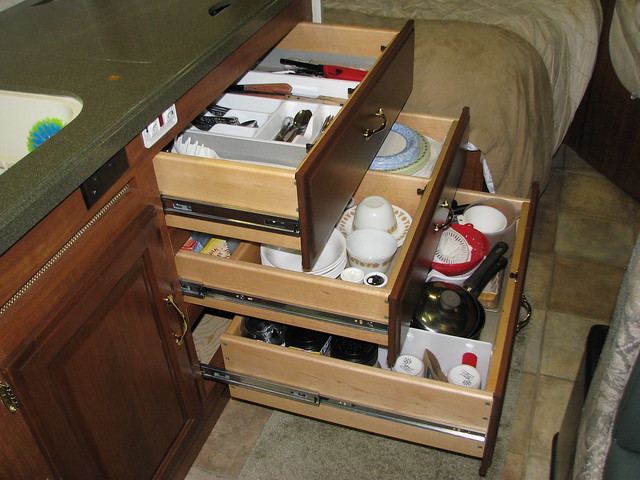
Top Drawer - center tray is the original PC utensil tray
Middle Drawer - Corelle, kitchen linen, & food wrap
Bottom Drawer - pots & pans & misc with tall mugs & cutting boards on the side
Now that the project is complete and we have lived with it a while, I would have done something different. That is swapping the height of the top drawer with the middle drawer.
1) The top drawer could easily be lower in height given just our utensils are stored there. I was concerned the stove above would be a fire hazard to items in the top drawer, but I was over-cautious.
2) The middle drawer would really benefit from that extra inch from the top drawer. We find ourselves fussing a bit so the taller items clear the hanging magnetic catches.
--------------------------------------------------------------------------------------------------------
Here is a reply I provided to some questions from an inquiry.
It was work to get the drawers the way I wanted, a learn-as-I-went-along process. I had to take them apart a number of times before I got them right. It was a good thing I screwed them together for easy disassembly. Doing it a second time, I think I could get by without taking them apart.
Here is what I learned, what I would do different, and other tips.
1) Make the cabinet vertical openings, 5" for top drawer for utensils, 6" for middle drawer for plates & bowls, 8" for bottom drawer for pots and pans. Basically swap my top and middle drawer vertical dimensions. Add up your total left-side/3 drawer cabinet vertical openings now and the 3 numbers must add up to the same after being reconfigured.
2) All drawer box backs and dividers should be 3/4" below the cabinet opening. The sides & fronts at 1/4". This will allow adequate clearance for drawer magnetic catches. I had all sides at a tight 1/4" and that had me disassembling the drawers to add clearance notches with every additional magnetic catch I added. It was painful, and surely avoidable had I known.
3) Make the top drawer less deep to the back wall than I did because your vertical depth would be 1" closer to the main counter top. Do NOT make the drawer to get under the Corian counter storage pocket as I did. If you go that deep to the back wall, it will be too shallow to utilize and things would likely get in the way of fully closing the drawer. You are giving up the back few inches of top drawer, but gaining 1" more height in the middle drawer for taller items. The shallow 5" height middle drawer we have limits what we can get in there. It works, but would work much better with that extra 1" of drawer height. I feel the trade-off is worth it. Swapping my top & middle drawer sizes (5"-6") would be smarter.
4) Do as I did with drawer closures. Get those button latches. They are strong and do the job right. Also use magnetic catches, two per drawer. They hold the drawers gently closed when the button latches are unlocked, useful when the rig is parked at a bad angle. Do NOT try to get by without the button latches by adding more magnet catches instead. You cannot add enough magnets because the weight in the drawers will overcome their hold in extreme road bumps in the turns. We started out with 5 magnets per drawer. My wife complained how hard it was to open the drawers, and in the end all the drawers popped open when driving, broke through the glide stops and all crashed to the floor.
5) The magnetic catches....Use the heavy duty ones that are twice as effective as the single ones. Both types are sold side-by-side in bins at Home Depot and other such places.
6) Things like the gas line for the stove, and the drain plumbing is likely going to be a "see-as-you-go" scenario as I would assume every rig has it's own situation. I also had to extend upward, my left-side (sink-side) interior cabinet wall to accommodate the drawer glide there. Plan for that if your cabinet interior is not high enough like mine was. My interconnecting board on the sink side got real close to the sink bowl which I cut at a steep angle to make it work. Your carpenter should be able to figure that out.
7) A super-skilled cabinet maker will use dovetail joints for premium quality, but there are so many different jointing methods in-practice. For me using 3/4" solid maple planking, the 3" deck screw butt joints worked well. If using a thinner or softer wood they would not hold up. The false front cherry faces of my finished drawer fronts are screwed to the box of the drawer. But a cabinet maker can use the face board in making the box. Either method works well except my method requires a notch in the drawer front to accommodate the button latches. That is extra work in a different way. I used dado joints to hold the drawer bottoms in place. They simply float in the frame of the drawer.
8) The horizontal 2" fixed portions of the main cabinet between drawers are called rails. Because they are so long, they bend too easy, not good for the button latches and magnetic catches. They must be reinforced on the back side with a 1x2 screwed 90 degrees horizontally, flush to the bottom of the rail. That extra board is ideal to mount the magnetic catches set-back with a false drawer front condition like I have.
9) Double-up on screws when mounting the drawer glides to the cabinet interior walls. 6-per glide will work. 3 per glide as provided for with the drawer glides is not enough. I learned that the hard way. They loosen too easily with vibration of the road.
Hopefully your cabinet maker can explain anything you might not understand from me.
I did not attach any pictures. Ask me for any pic I might have to clarify some of what I had written.
I realize you are asking for specific dimensions, but your own cabinet and rig will dictate that as they all vary with every rig. In general, I made every drawer a tight 1/4" (1/8" per side) smaller than it's cabinet opening and to a back wall. It worked, but I had to watch things closely. The drawer glides want the drawer sides real close and the 1/8" was just enough. Any more would make matters worse. Any less would be better for the glides, but potential for scraping wood-to-wood when opening a drawer. I am not a cabinet maker so I would hope your pro will be smarter than me about it.